Technology plays a major role in the life of every single human being. Along with technology it became much easier to safeguard the privacy and confidential matters in the utmost safe place. We were all able to upload files, pictures, messages or any type of a folder in an account and get it authentically secured. So this way we are assured that our privacy would be maintained.
So all what we needed was the right app or the write account and then an id along with a password would do great to secure our important accounts. So our official/ private mails and other type of folders were uploaded and kept safe. But there are other things that we should think about too. Since things get advanced day by day we are also in a state to think in an advanced way.
We should also mention how slowly along with the advancement of technology some technological thefts and errors started coming up. With this hackers started to rule the internet. No matter how authentically secured the account is, they easily hacked them and found simple methods for do this. Thus this created a panic across; all the important, high profiles were hacked and the information in them were stolen and used against them illegally. This started to become a big loss and a major problem to all the official account holders. A password protection could do nothing big to safe guard those profiles.
In a time like this everyone started yearning for a more secured method to safeguard the privacy and official information. This started a few years ago and still there are hackers trying to hack accounts and create problems. To solve this problem there is one great method known as the 2-step verification which will secure the accounts without any doubts. 2-step verification is also known as the two- factor authentication. With this method we will be able to add one more step to secure the accounts along with the password. Two step verification/ two factor authentication is security system step that will send a OTP/ code or a password to the account holder via sms to the given phone number or email. Using this OTP code or the password we will be able to sign in to our accounts.
This OTP code will be received every time someone tries to open up the account after the login id and the password in inserted. So every time a new code will be received. With this step it is actually not possible for the hackers to get into the accounts as only the account holder will receive the code. Hence so with this non hacking security system now you will be able to secure your accounts without any fear. Along with that, it will also show you the location and device in which the account was tried to sign in. That will give you an alert to show if someone else try to get into your account and grab information of yours. So now let’s see how to secure the Google and Gmail using the 2-step verification.
Then scroll down in the 2-Step verification bar and turn on the "use your phone to sign in" option to activate the verification process.
Once after the verification is activated you will receive a panel of information regarding the security system and the strength of how it is safeguarded.

Next, you will have to provide the account with your personal mobile number, in which you will receive the OTP code or the password every time you try to sign in the account. The code can be received via sms or even a call. You can set it according to your priority.

Now, you will receive the authentication via sms or call. Through the method you chose.
Then type in the OTP code that you received to activate the 2-step verification to google and gmail accounts.

That’s it. Now you have activated the two factor authentication to your Google and Gmail accounts. With this security system now you can simply secure all your important files and mails without any tension. This method is undoubtedly the most secured method found. Hope this was useful for you.
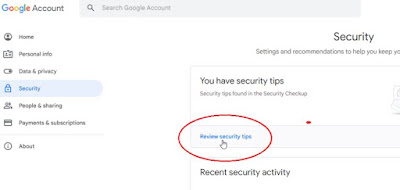
Thereafter you will know what's the problem, but if there were no issues found then Google will recommend some tips which will help you secure your account further. You will find "You have security tips", there you have to select the "Review security tips" link to check on it. In case there are no security issues or tips for you, then you will find it will say "Your account is protected". Furthermore you can also click on the "See details" link to read the review of the settings.
To make it easy, Google has categorized the possible potential security issues in regard with how you use your account and which issues are recognized. The potential categories includes,
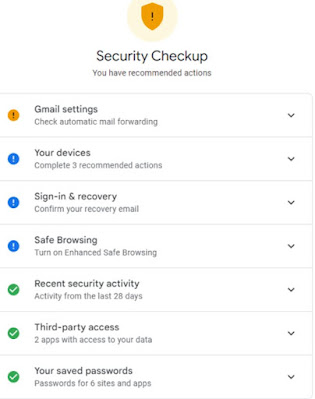
If you find any yellow or blue exclamation next to any category, it indicates that there are possible issues. In the same way of you find a green exclamation mark, then it means that there is no security issue, your account is safe and secure. But it is always better to review all the categories for the safety. Now let us also take a look at how you can secure the google account within all the categories.
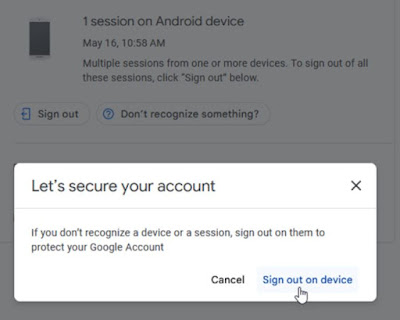
If you click on the tab "Where you're signed in", it will show all the devices that are connected to your account. There you can click on any specific device to see more details. If you find any unknown accounts, the you can click on "Sign out" or "Don't recognize something?" > "Sign out on device".
There you can also change the password if you want to but you have to provide all the devices with the new password. You have to do this procedure to secure your account if you think that there is someone using your account.
Then you will be asked to change your password. If you do change your password then you will also have to login to all your devices that you have used your accounts to and sign in.
You will want to update some recovery information such as recovery email, phone number, security questions and trusted devices. If you already have updated with your working email id and phone number, the you can simply click "Yes, confirm" so that they will remain the same. If you don't have one updated, then click on "No, update" and re enter your current password to change it.

If you want to remove any mobile devices or have to change the security questions the you can do so by clicking on the "Info" icon to update.
This is important to check only if you have enabled any third party services from Workspace. For example this will happen when you have set up access to Gmail through your email software, it will be under the third party access.
Next you will have to click on the "Check password" option and type in your google account password.
When you press on the three dots icon, you can get some additional options. If you press on the "View password" you will get to see your password in a plaintext.
But for a more secured account and for betterment, you can go to Google's main security page and there you can do some additional updates such as enable Google's passkey feature and also you can find a lost device, can also manage which sites and services have used to sign in with Google for login purposes and more. This will help you have a secured account.
We should also mention how slowly along with the advancement of technology some technological thefts and errors started coming up. With this hackers started to rule the internet. No matter how authentically secured the account is, they easily hacked them and found simple methods for do this. Thus this created a panic across; all the important, high profiles were hacked and the information in them were stolen and used against them illegally. This started to become a big loss and a major problem to all the official account holders. A password protection could do nothing big to safe guard those profiles.
In a time like this everyone started yearning for a more secured method to safeguard the privacy and official information. This started a few years ago and still there are hackers trying to hack accounts and create problems. To solve this problem there is one great method known as the 2-step verification which will secure the accounts without any doubts. 2-step verification is also known as the two- factor authentication. With this method we will be able to add one more step to secure the accounts along with the password. Two step verification/ two factor authentication is security system step that will send a OTP/ code or a password to the account holder via sms to the given phone number or email. Using this OTP code or the password we will be able to sign in to our accounts.
This OTP code will be received every time someone tries to open up the account after the login id and the password in inserted. So every time a new code will be received. With this step it is actually not possible for the hackers to get into the accounts as only the account holder will receive the code. Hence so with this non hacking security system now you will be able to secure your accounts without any fear. Along with that, it will also show you the location and device in which the account was tried to sign in. That will give you an alert to show if someone else try to get into your account and grab information of yours. So now let’s see how to secure the Google and Gmail using the 2-step verification.
Turn On 2-Step Verification in Gmail
Firstly go to the "Settings" tab in your Gmail account.
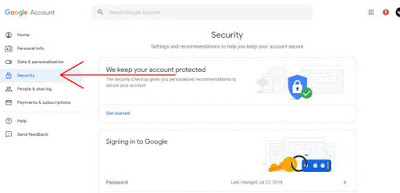
Next, in the "menu" bar on the left side of the screen, click on the "Security" and look for the 2-step verification.
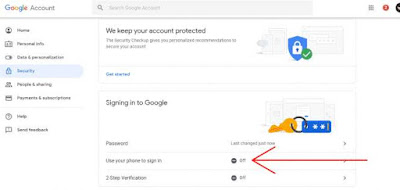
Then scroll down in the 2-Step verification bar and turn on the "use your phone to sign in" option to activate the verification process.
Once after the verification is activated you will receive a panel of information regarding the security system and the strength of how it is safeguarded.
There after you will be able to see a window like shown below.
Next, you will have to provide the account with your personal mobile number, in which you will receive the OTP code or the password every time you try to sign in the account. The code can be received via sms or even a call. You can set it according to your priority.
Now, you will receive the authentication via sms or call. Through the method you chose.
Then type in the OTP code that you received to activate the 2-step verification to google and gmail accounts.
That’s it. Now you have activated the two factor authentication to your Google and Gmail accounts. With this security system now you can simply secure all your important files and mails without any tension. This method is undoubtedly the most secured method found. Hope this was useful for you.
Additionally we will also see how to run a Google security check. This will help you to clarify if another person or service is having unauthorized access to your Google account.
How to Run Google security Check
To get started, from the Google browser you have to open the Google security page and then sign in with your Google account. Here even before you start, Google will automatically detect any security issues. There you will see "You have security recommendations" alert, then select the link "Protect your account" and there you have to check on what are the issues you can deal and fix.Thereafter you will know what's the problem, but if there were no issues found then Google will recommend some tips which will help you secure your account further. You will find "You have security tips", there you have to select the "Review security tips" link to check on it. In case there are no security issues or tips for you, then you will find it will say "Your account is protected". Furthermore you can also click on the "See details" link to read the review of the settings.
Your devices
Sign-in and recovery
Recent security activity
Third party access
Safe browsing
Saved passwords.
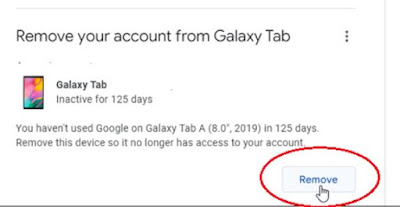
Remove Old and Unknown Devices
First you have to select the tab called "Your devices", which will show all the current devices that are signed into your account. Also it will show the previously logged in accounts but isn't signed in now or for a longer time. The devices will be named as follows: Windows PC, Mac, iPhone, iPad, Android phone or Smart TV.There if you find any suspicious devices or if there are any devices that you don't use or isn't yours, then click on "Remove" button.
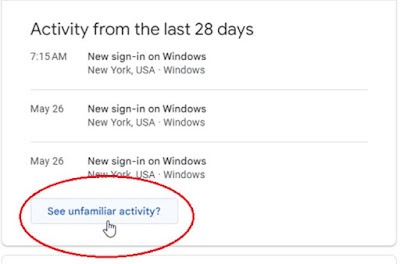
View Recent Account Activity
You can go to the "Recent security activity" which is available on the security checkup page to check on your recorded events, which includes all the sign-ins with your Google accounts on specific devices and the changed passwords. Here if you find any unfamiliar or suspicious activity then you can select the "See unfamiliar activity" option.
Update Account Recovery Methods
For this you have to go to the "Sign in and recovery" category which will be available on the Security checkup page. There you can review your account recovery methods. There you will notice many recovery methods which will be available to gain access to the account incase you are locked out. It will also provide you information about all the trusted devices that can be used to verify your identity.You will want to update some recovery information such as recovery email, phone number, security questions and trusted devices. If you already have updated with your working email id and phone number, the you can simply click "Yes, confirm" so that they will remain the same. If you don't have one updated, then click on "No, update" and re enter your current password to change it.
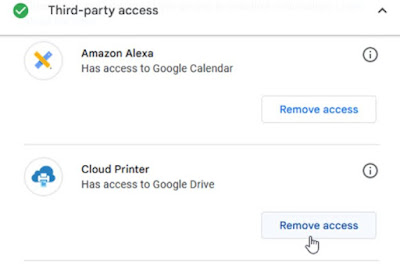
Control Third Party Access
If you want to see what services have access to your google account the you can do it by clicking on the "Third party access" option which is available on the security checkup page. There if you think you want more details regarding it, then click on the "Info" icon to know more. Or you can also disable all the google services for that app by clicking on the "Remove access" option.Enable Safe Browsing
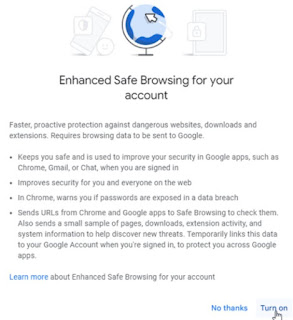
You can update the safe browsing option by clicking on the "Safe browsing" category. This option will protect your account from malicious websites, suspicious downloads, phishing emails and some dangerous extensions that might try to get important information or ruin your device. To enable safe browsing, you have to click "Continue" and "Turn on".
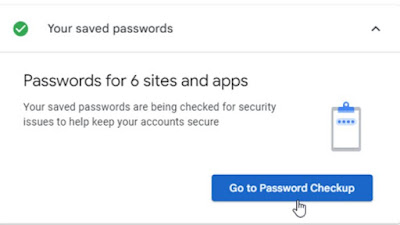
Check Saved Passwords
In this category you can check for all the passwords for websites or services which have been saved under the Google account.To do so, go to the "Saved password" option and select "Go to passwords checkup".
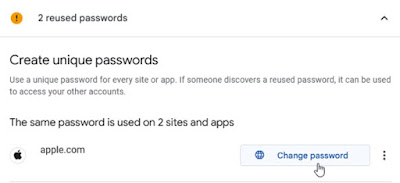
There you will get all the information such as which account data was compromised in the data breach, what is the password that has been reused and the ones that seem to be too weak.
Select the one that you want and click on the "Change password" which will open up to the website and there you have to update the password.
You have to click on the "Update saved password" to change the passwords from the Google database. Click on "Delete password" if you want to remove the passwords from the Google record.
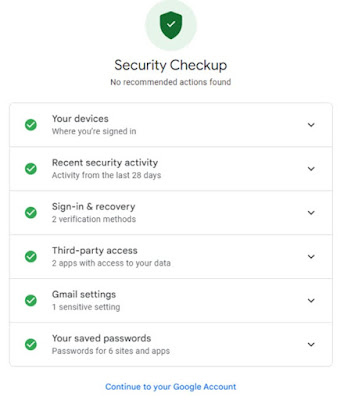
Enable More Security Features
In this category of security checkup, you will have to see that the has page mentioned that there are no more recommended actions and also all the categories should have a green check mark. Then you are done.
But for a more secured account and for betterment, you can go to Google's main security page and there you can do some additional updates such as enable Google's passkey feature and also you can find a lost device, can also manage which sites and services have used to sign in with Google for login purposes and more. This will help you have a secured account.